Setting Up Supabase
Supabase is a popular backend-as-a-service platform that provides authentication, database, storage, and real-time capabilities for your app. This guide walks you through setting up Supabase in your Draftbit app using environment variables and the AI Agent.
Get Your Supabase Credentials
Section titled “Get Your Supabase Credentials”Before you begin, make sure you have:
- A Supabase account (sign up for free)
- A Supabase project created
From your Supabase project dashboard, follow these steps to get your credentials:
-
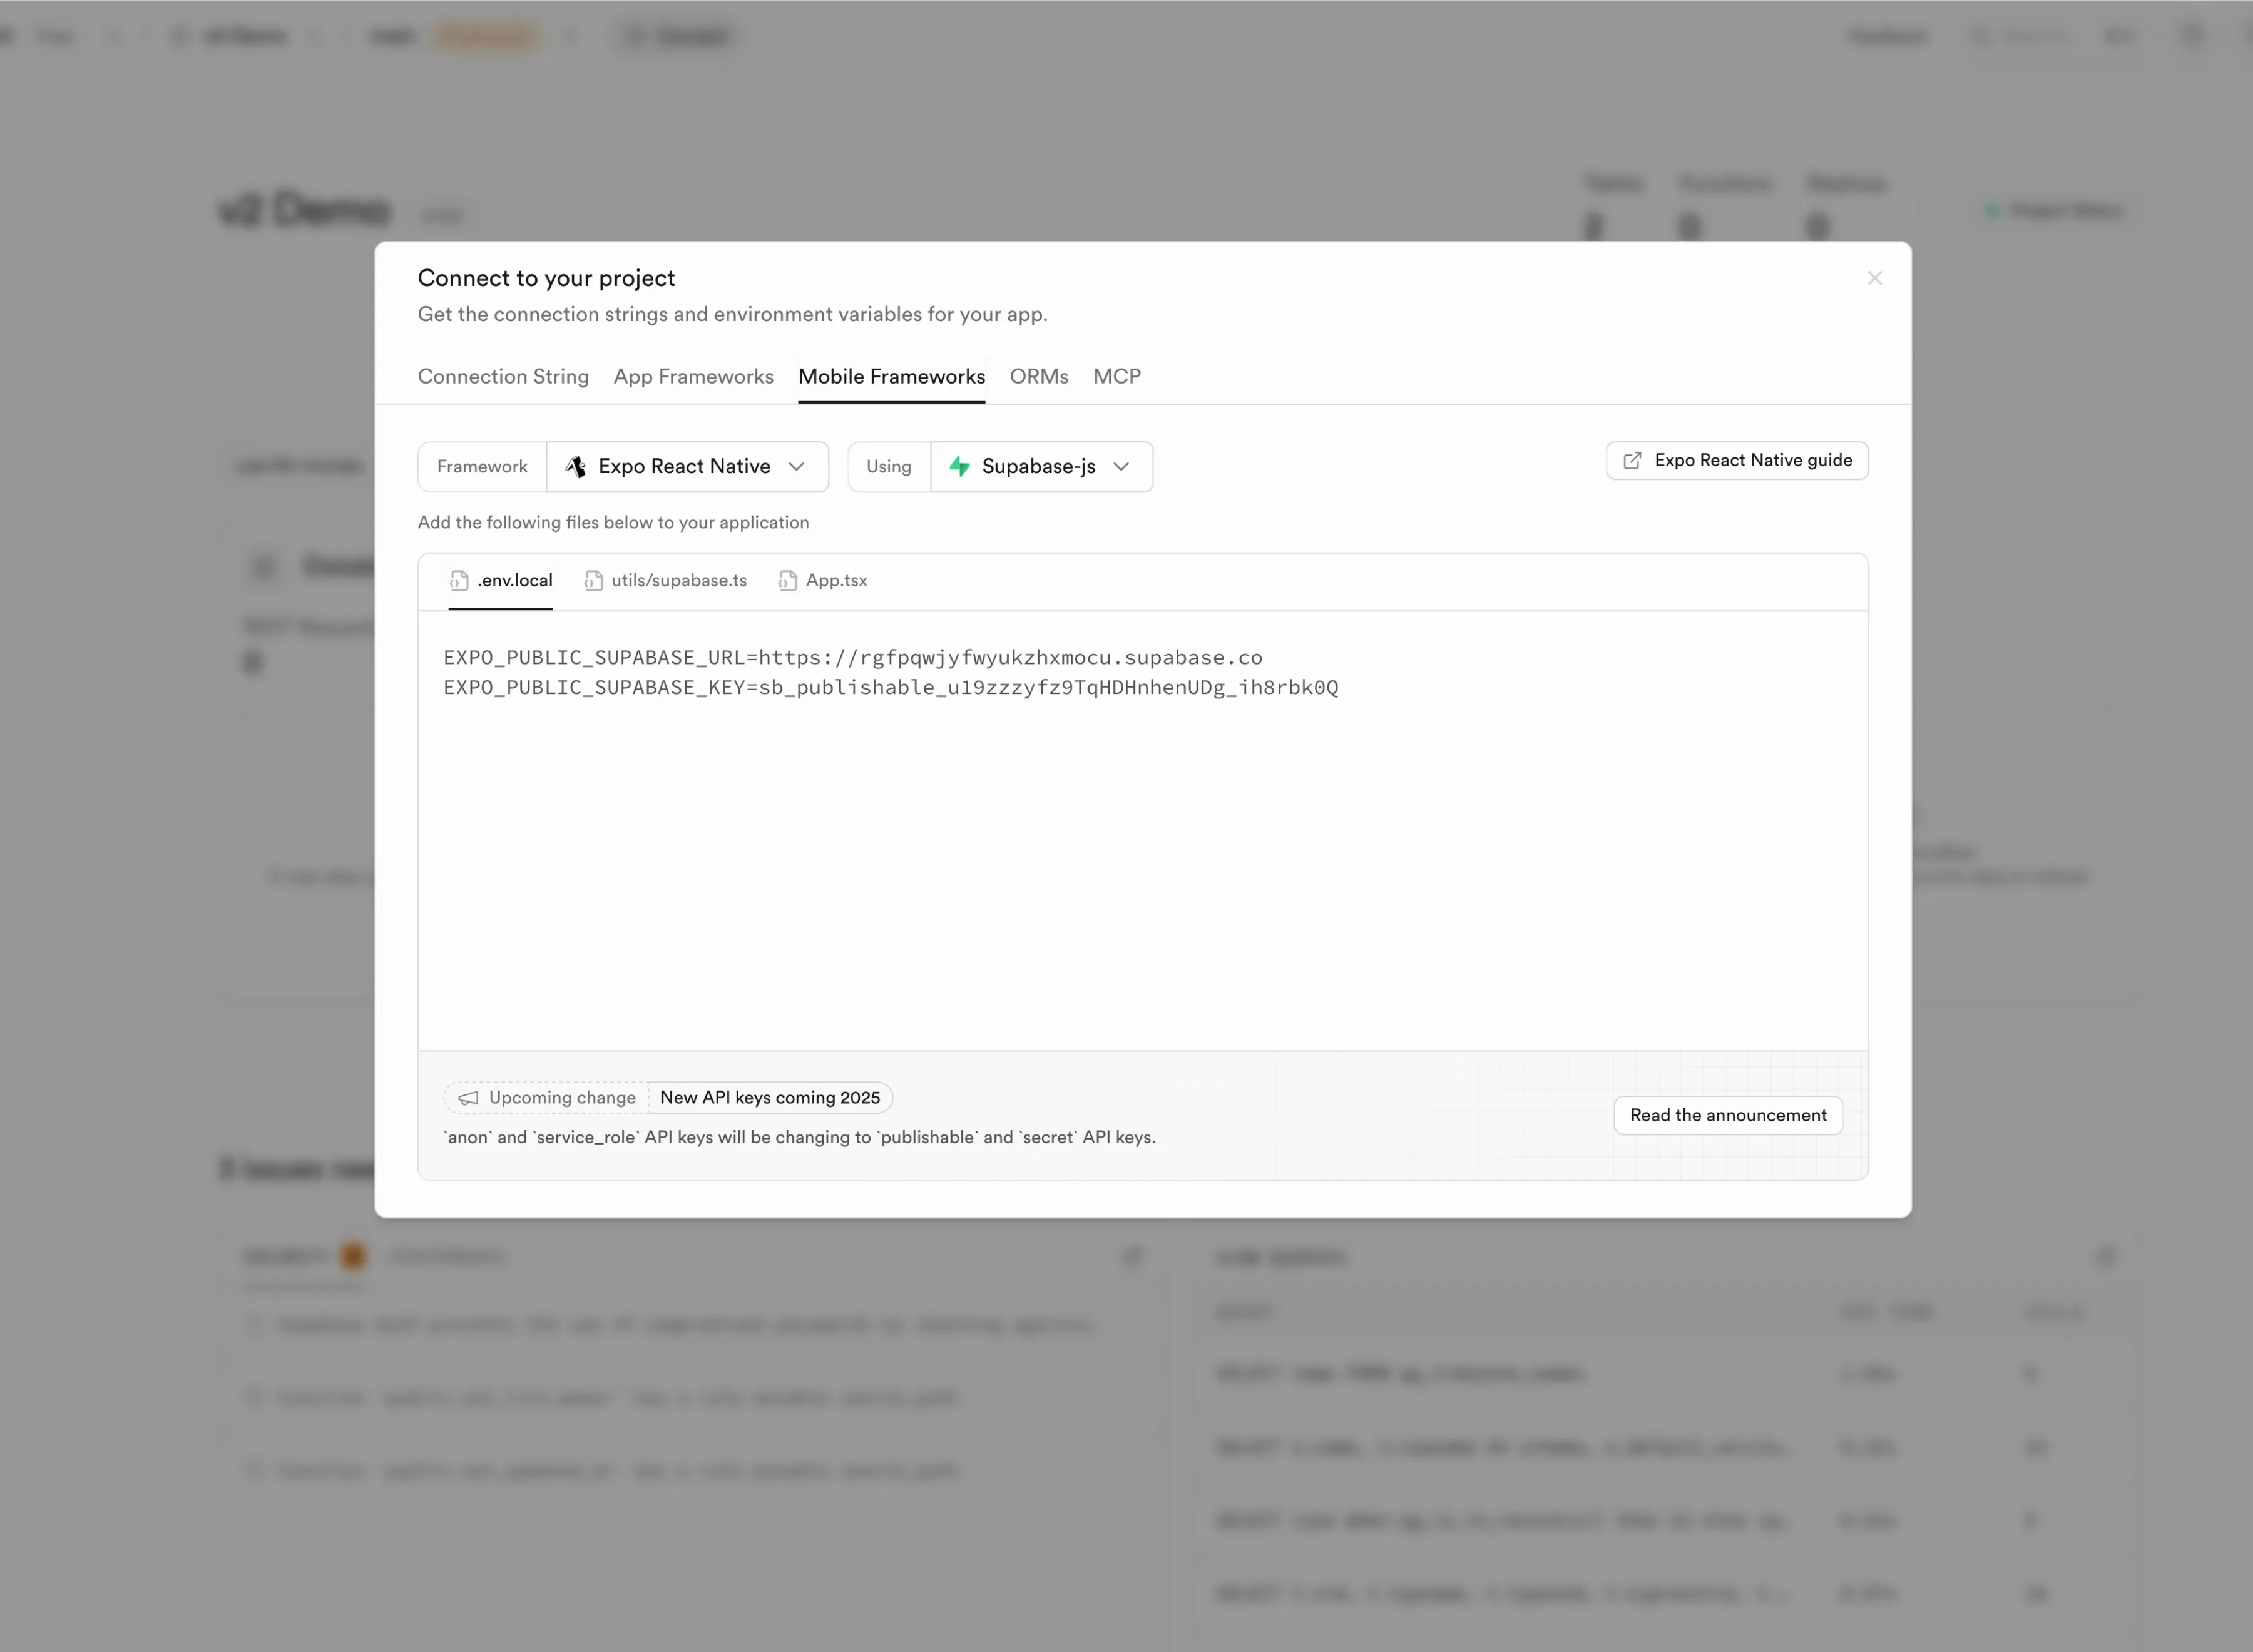
Open the Credentials Panel
Click the
 button in the top header bar to open the credentials panel.
 -
Select Mobile Frameworks
Select the Mobile Frameworks tab, make sure Expo React Native is selected as the framework, and Supabase-js is selected as the method.
-
Get Your Credentials
You’ll add these credentials as environment variables in Drafbit’s Environments page in the next step:
EXPO_PUBLIC_SUPABASE_URL=<your-project-url>EXPO_PUBLIC_SUPABASE_KEY=<your-project-publishable-key>
Add Environment Variables
Section titled “Add Environment Variables”Now you’ll add your Supabase credentials as environment variables in Draftbit. Navigate to the Environments page in your Draftbit app.
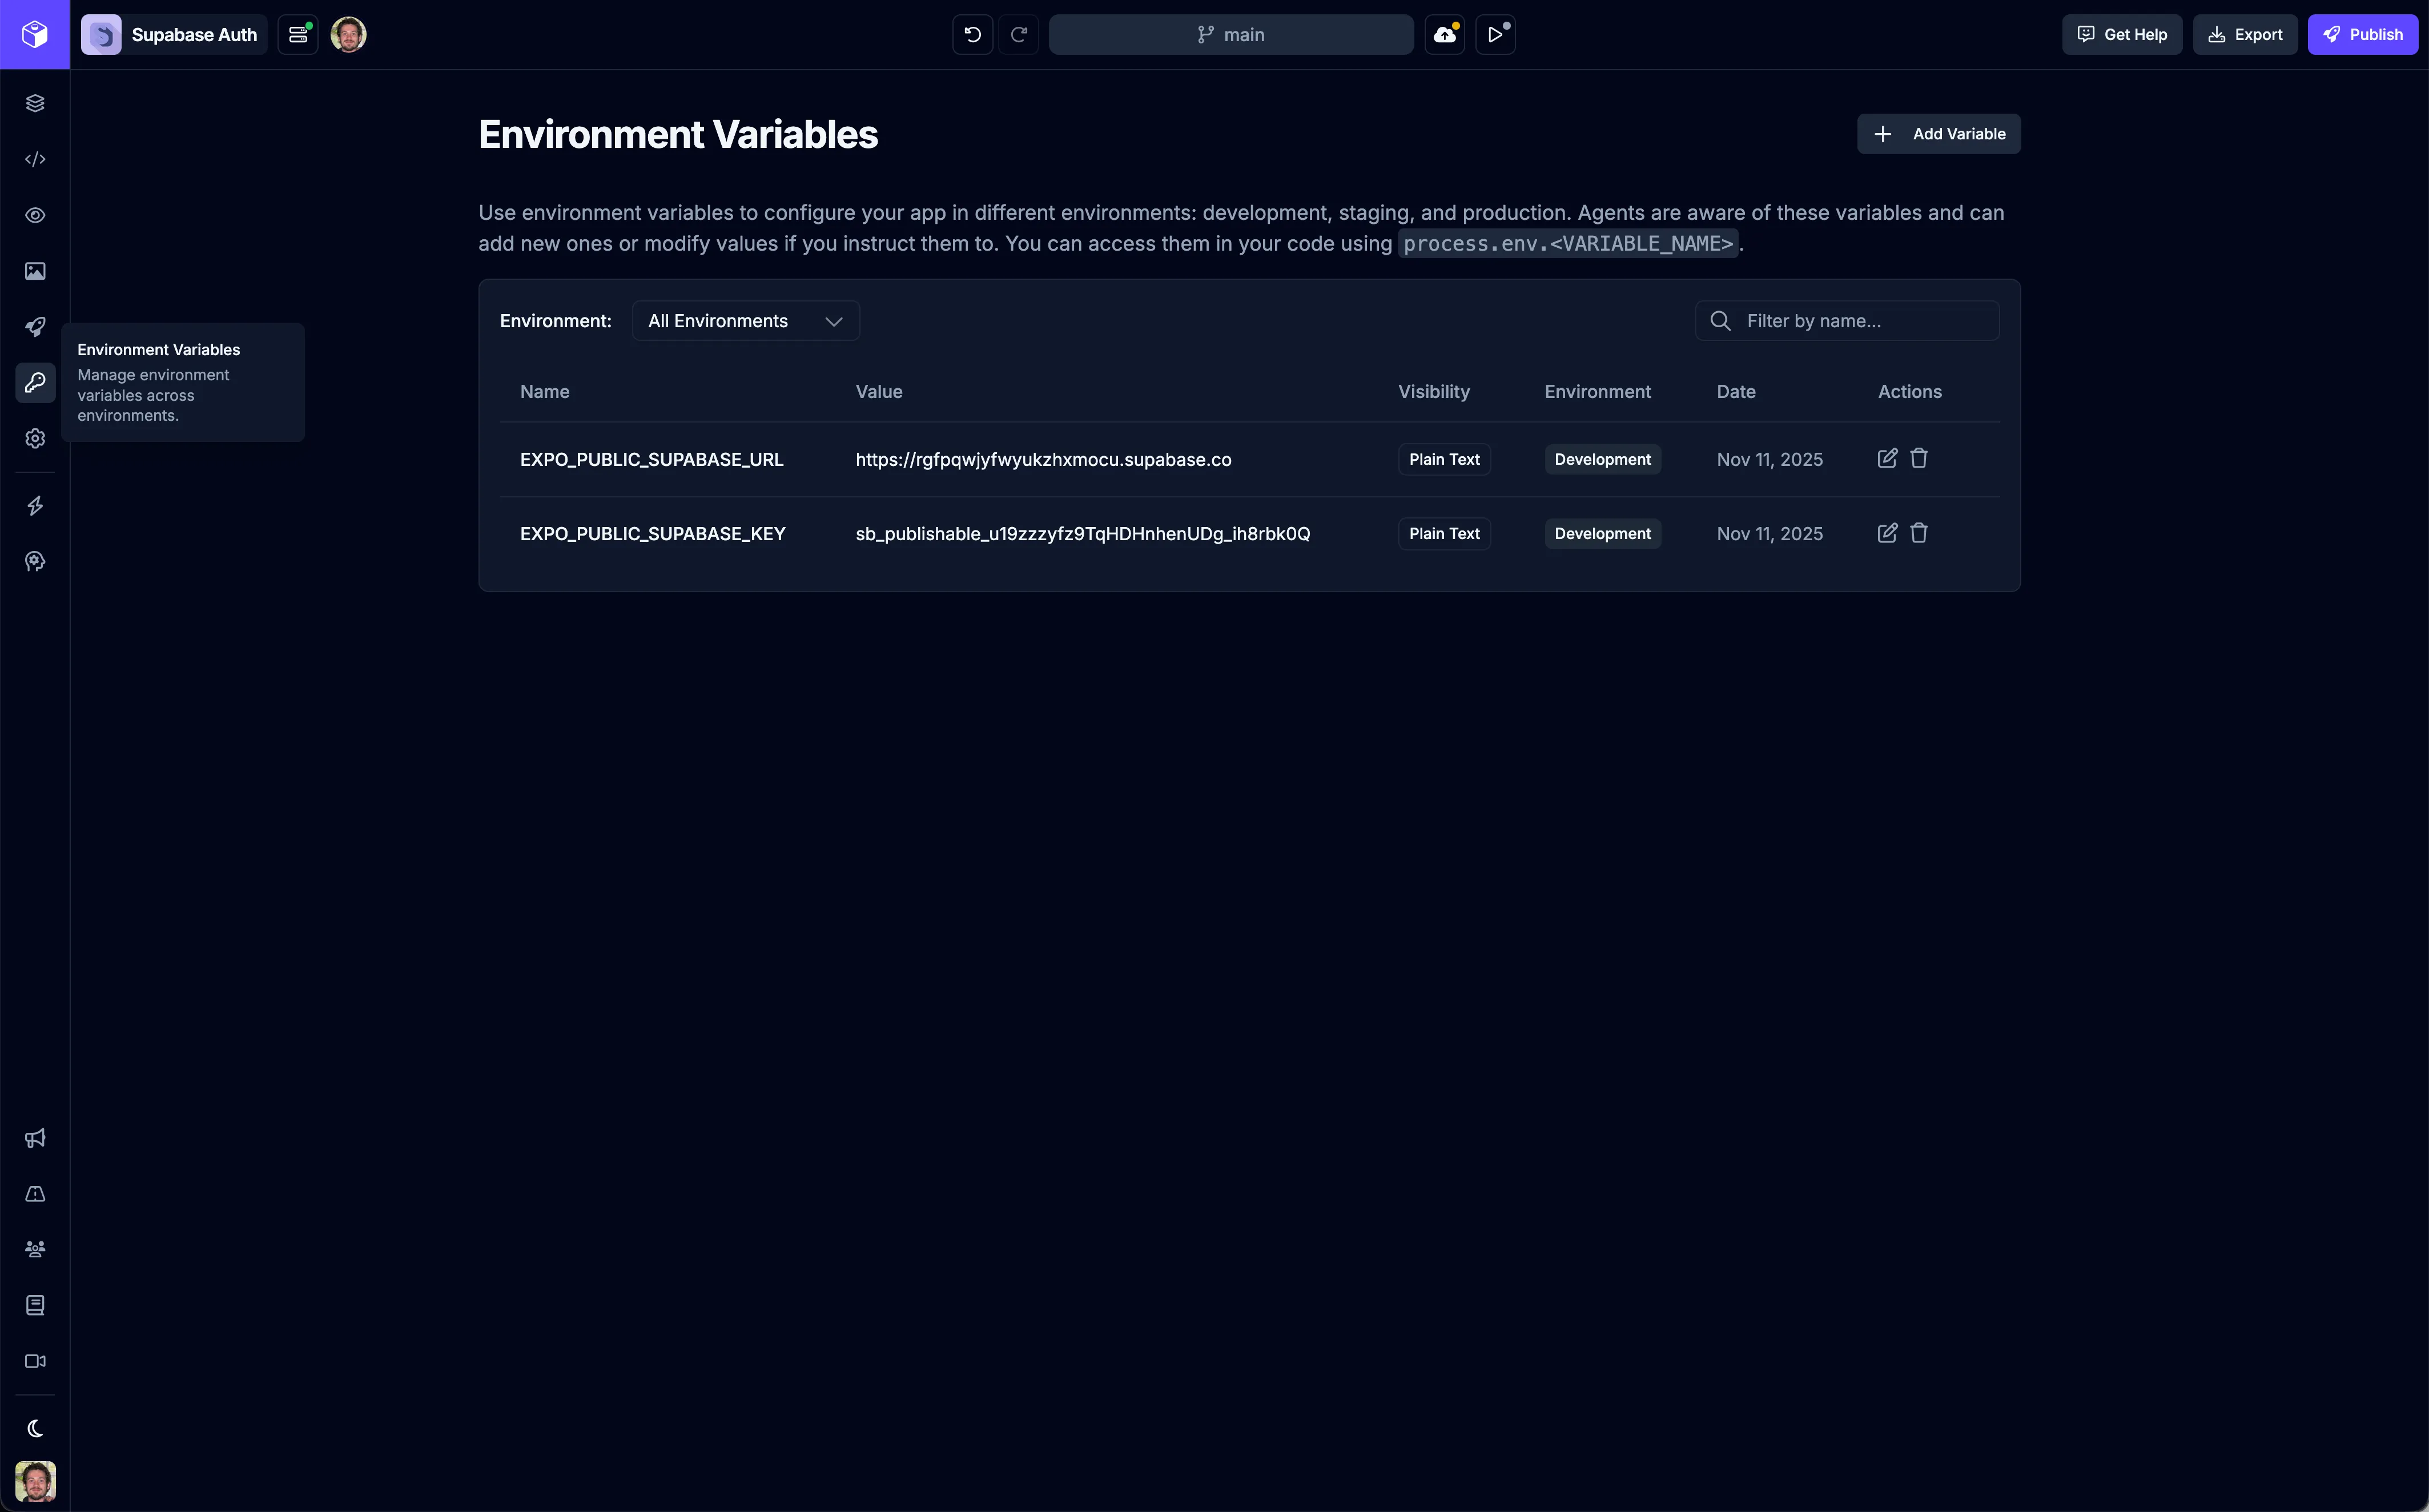
Click the ![]() button to add a new environment variable. You’ll need to create two variables by copying and pasting the credentials from Supabase into the Draftbit UI.
button to add a new environment variable. You’ll need to create two variables by copying and pasting the credentials from Supabase into the Draftbit UI.
Supabase URL
Section titled “Supabase URL”- Name: Copy and paste
EXPO_PUBLIC_SUPABASE_URLfrom Supabase - Value: Copy and paste your Supabase project URL (e.g.,
https://your-project.supabase.co) - Visibility: Plain text
- Environments: Select all environments where you want to use this (Development, Staging, Production)
Supabase Publishable Key
Section titled “Supabase Publishable Key”- Name: Copy and paste
EXPO_PUBLIC_SUPABASE_KEYfrom Supabase - Value: Copy and paste your Supabase project’s publishable API key
- Visibility: Plain text
- Environments: Select all environments where you want to use this
Install Supabase SDK
Section titled “Install Supabase SDK”Once your environment variables are set up, you’ll need to install the Supabase JavaScript client library. You can do this by asking the AI Agent in the AI Chat:
“Install the @supabase/supabase-js package”
The AI Agent will add the package to your project’s dependencies automatically.
Create a Supabase Client
Section titled “Create a Supabase Client”Now you’ll create a Supabase client instance that uses your environment variables. Ask the AI Agent:
“Create a Supabase client file that initializes Supabase using the EXPO_PUBLIC_SUPABASE_URL and EXPO_PUBLIC_SUPABASE_KEY environment variables”
The AI Agent will create a file (typically lib/supabase.ts or utils/supabase.ts) that looks something like this:
import { createClient } from '@supabase/supabase-js';
const supabaseUrl = process.env.EXPO_PUBLIC_SUPABASE_URL!;const supabaseKey = process.env.EXPO_PUBLIC_SUPABASE_KEY!;
export const supabase = createClient(supabaseUrl, supabaseKey);
This client can now be imported and used throughout your app. The AI Agent can use this file to connect screens to your backend and it can also be used when you write code yourself in the Code Editor—simply import the supabase client wherever you need to interact with Supabase in your code.
Use Supabase in Your App
Section titled “Use Supabase in Your App”With the Supabase client set up, you can now use it to build features. Here are some common examples:
Authentication
Section titled “Authentication”Ask the AI Agent to add authentication features:
“Create a login screen that uses Supabase authentication with email and password”
“Add a sign up screen that creates a new user account using Supabase”
“Create a profile screen that displays the current user’s information from Supabase”
Database Queries
Section titled “Database Queries”You can query your Supabase database:
“Create a screen that fetches and displays a list of items from the Supabase ‘products’ table”
“Add a details screen that shows a single product from Supabase based on the product ID”
“Create a form to add a new item to the Supabase ‘products’ table”
Real-time Subscriptions
Section titled “Real-time Subscriptions”Supabase supports real-time updates:
“Update the products list screen to subscribe to real-time changes in the Supabase ‘products’ table”
Storage
Section titled “Storage”You can use Supabase Storage for files:
“Add image upload functionality using Supabase Storage”
“Display images from Supabase Storage in the product details screen”
Example Authentication Flow
Section titled “Example Authentication Flow”Here’s a complete example of setting up authentication with Supabase using the AI Agent:
-
Add environment variables (as described above)
-
Install Supabase client:
“Install @supabase/supabase-js”
-
Create Supabase client:
“Create a Supabase client file using EXPO_PUBLIC_SUPABASE_URL and EXPO_PUBLIC_SUPABASE_KEY”
-
Create authentication screens:
“Create a login screen with email and password fields that authenticates users using Supabase”
“Create a sign up screen that registers new users with Supabase”
“Create a profile screen that shows the current user’s email and has a logout button”
-
Add navigation:
“Add navigation so users go to login if not authenticated, and to the main app if they are authenticated”
The AI Agent will handle all the code generation, including:
- Form validation
- Error handling
- Loading states
- Navigation logic
- Session management
Best Practices
Section titled “Best Practices”-
Use environment variables for all Supabase configuration: Never hardcode your Supabase URL or keys in your code. Always use environment variables so you can easily switch between development, staging, and production environments.
-
Set up Row Level Security (RLS): Make sure to configure RLS policies in your Supabase dashboard to protect your data. The publishable key is public, so RLS is essential for security.
-
Handle errors gracefully: The AI Agent will add error handling, but make sure to test authentication failures, network errors, and other edge cases.
-
Use TypeScript types: Ask the AI Agent to generate TypeScript types for your Supabase database schema:
“Generate TypeScript types for my Supabase database schema”
-
Test across environments: Use different Supabase projects for development, staging, and production, and configure your environment variables accordingly.
Troubleshooting
Section titled “Troubleshooting””Cannot read property of undefined” errors
Section titled “”Cannot read property of undefined” errors”Make sure your environment variables are set correctly and prefixed with EXPO_PUBLIC_. Check the Environments page to verify your variables are saved.
Authentication not working
Section titled “Authentication not working”- Verify your Supabase URL and publishable key are correct
- Check that email authentication is enabled in your Supabase project settings
- Ensure your Supabase client is initialized before use
Database queries failing
Section titled “Database queries failing”- Verify Row Level Security policies allow the operations you’re trying to perform
- Check that your table names match exactly (case-sensitive)
- Ensure your Supabase project is active and not paused
Environment variables not available
Section titled “Environment variables not available”- Make sure variables are prefixed with
EXPO_PUBLIC_ - Verify you’ve selected the correct environments (Development, Staging, Production)
- Try rebuilding your app after adding new environment variables